Using WebP images in HTML and CSS
The WebP image format from Google promises to replace both JPEG and PNG/GIF with more efficient compression and higher quality. Safari 14 recently added support for the format and it's now supported in all major browsers.
WebP supports lossy compression, like JPEG, where you chose a quality target between 1-100 (usually 75-85 yields nice results) and the image will be compressed. This can introduce artifacts (blocks) in the image but also great file size savings. Like PNG/GIF WebP also supports lossless compression, support for alpha transparancy and animations.
Using WebP in HTML
You can use a WebP image in a normal <img> tag, but in browsers that without WebP support the image would be broken.
Instead the <picture> tag allows us to specify a list of different image formats as well as versions for dark mode and various resolutions. The browser will pick the most appropriate version and fall back to the image defined in the <img> tag if WebP isn't supported:
<picture>
  <source type="image/webp" srcset="[email protected] 1x, [email protected] 2x" media="(prefers-color-scheme: dark)">
  <source type="image/webp" srcset="[email protected] 1x, [email protected] 2x">
  <source type="image/jpeg" srcset="[email protected] 1x, [email protected] 2x" media="(prefers-color-scheme: dark)">
  <source type="image/jpeg" srcset="[email protected] 1x, [email protected] 2x">
  <img src="[email protected]" alt="describe image content" loading="lazy">
</picture>
In the code above we have different image versions in both WebP and JPEG to support high-res displays with 2x pixel density as well as dark mode.
The image at the end of this article uses this code. Try and toggle dark mode in your browser to see it in effect.
Using WebP in CSS
It's also possible to use WebP as a background with CSS. image-set is an emerging notation which is now supported on all major browsers (some might require a -webkit- prefix). The concept is the same as above, we specify a range of different file types and resolutions of our image, and the browser will pick the appropriate version. As a fallback we specify a normal background-image instruction first:
.masthead {
  background-image: url("[email protected]");
  background-image: image-set(
    url("[email protected]") 1x,
    url("[email protected]") 2x,
    url("[email protected]") 1x,
    url("[email protected]") 2x
  );
}
To set the dark mode versions of the same images you can use a @media query:
@media screen and (prefers-color-scheme: dark) {
  .masthead {
    background-image: url("[email protected]");
    background-image: image-set( ... );
  }
}
Converting images to WebP
There's a number of good online converters and some allow you to fine tune the settings like Squoosh.
Google also provides a handy command line tool cwebp to convert your images to WebP:
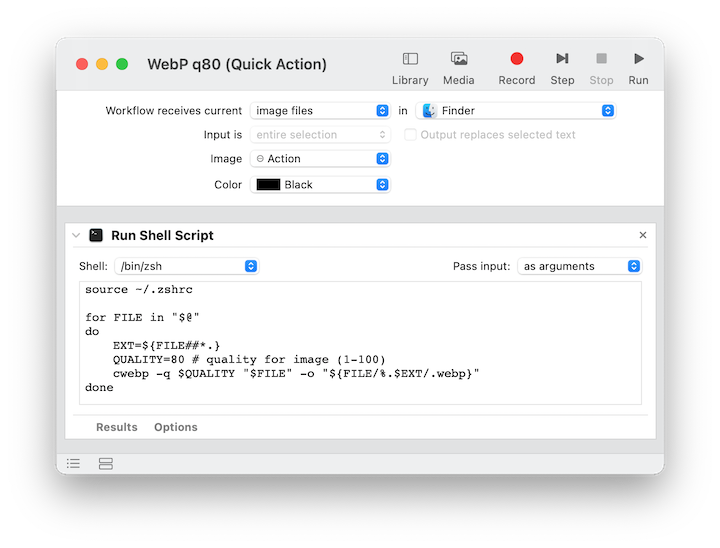
cwebp -q 80 image.png -o image.webpAfter installing cwebp you can use macOS Automator to create a Quick Action, letting you right click multiple image files and convert them all to WebP:

The script is here for copy+paste. The first line is to get the right PATH setup. You might have a different shell configuration (e.g. ~/.bashrc).
source ~/.zshrc

for FILE in "$@"
do
	EXT=${FILE##*.}
	QUALITY=80 # quality for image (1-100)
	cwebp -q $QUALITY "$FILE" -o "${FILE/%.$EXT/.webp}"
done